Large Display Framework: Tutorial 1
PART I: CREATING A SIMPLE APPLICATION USING THE LDF TOOLKIT
This tutorial will guide you through the process of setting up and using the Large Display Framework developed in the Interactions Lab at the University of Calgary. In Part I, you will be creating a simple application that makes use of some components from the toolkit package. In Part II, you will learn how to create your own strategy classes.
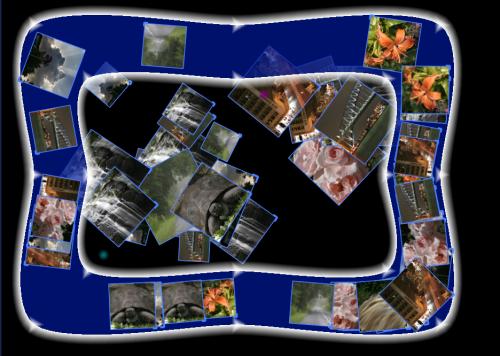
The application you will be creating in this first part consists in an interface currents container and a set of picture components. We will be assigning some properties to these components, like RNT and tossing, based on the classes available in the LDF Toolkit. The image below shows how this application looks like.
Requirements
Although the core of the framework does not depend on any third party APIs, this tutorial and the LDF Toolkit require some other libraries to be used. The toolkit uses OpenGL (http://www.opengl.org), GLUT (http://www.opengl.org/resources/libraries/glut/) and DevIL (http://openil.sourceforge.net/). The tutorial uses Qt (http://trolltech.com/products/qt) for window management and the Smart Board SDK (http://smarttech.com/) for large display interaction. We do not cover anything related to these APIs in this tutorial. If you are not familiar with any of them, we recommend reading some other online tutorials first (http://www.google.com).
Source Code
A Visual Studio 2005 solution is available (here) with the code in this tutorial and some additional features, such as making the application full-screen across multiple monitors. Due to distribution issues, none of the auxiliary libraries is included in the solution package. They must be added in order to compile and run the project.
Basic Concepts
The Large Display Framework is based on two concepts:
- i-buffers and composition of visual components.
Interaction buffers, or i-buffers, are data structures that hold information that influences the behavior and appearance of visual components. They might affect the component's color, size, rotation, displacement, etc. A visual component that can contain other components is called a container. The structure defined by the set of components and containers is referred to as a composition tree. We assume that all components and containers are under a single container that represents the background of the application and that consists in the root of the composition tree. For more detailed information, please refer to Isenberg et al. [Isenberg et al., A Buffer Framework for Supporting Responsive Interaction in Information Visualization Interfaces, 2006].
Another important aspect of the framework is the component's strategies. Strategies are classes that define how a component should behave and draw itself. Components can have a sequence (or chain or stack, as you prefer to name it) of strategies that provide accumulative functionalities. A strategy class implements one or more methods defined in the VisComponentStrategy class interface. These methods deal with component drawing, event handling, and i-buffer management. We will discuss them later, when we show how to create such classes.
Project Setup
In order to start using the framework, you need to add it to your project. If you are using MS Visual Studio 2005, you can follow the steps below:
- Download the framework binaries (innernet\LargeDisplayFramework) and unzip the file;
- Create a project, if you don't have one already. If you don't have one, make sure the QT Visual Studio integration is installed and select
new Project->QT Projects->QT Console Application.Choose the Core, GUI, and OpenGL libraries to be used (and others that you may need for your individual project) - In
Project->Properties->Configuration Properties->C/C++->General->Additional Include Directories, add the path to the header files from the framework (do this for the Debug and Release configurations); - In
Project->Properties->Configuration Properties->Linker->General->Additional Library Directories, add the path to the lib files from the framework (do this for the Debug and Release configurations); - In
Project->Properties->Configuration Properties->Linker->Input->Additional Dependencies, add the name of all lib files used from the framework separated by a space (note that the files for the Debug and Release configurations are different); - After building, copy the corresponding DLL files from the framework to the output directory for each configuration.
If you are using a different IDE, please refer to its documentation for instructions on how to compile, link, and run programs using external libraries.
Displaying Visual Components
Let's use the framework to display some components. We want to have an application with an interface current container and a number of picture components.
The first thing to do is to create a subclass of the LargeDisplayManager. This class is responsible for controlling the component structure and buffer manipulation. It is the main interface of an application with the framework and has four virtual methods that must be implemented by its subclasses (initTouchIndicator(), initComponents(), pickComponent(), and pickContainer()).
The DefaultManager class in the toolkit already provides a default implementation of the initTouchIndicator(), pickComponent(), and pickContainer() methods. These methods make available two circular touch indicators and back-buffer-based picking for components and containers. Therefore, if we inherit from the DefaultManager class, only the initComponents() method has to be implemented. This method provides any content (i.e., components) that we might want to display as our application starts.
As we implement our subclass of the LargeDisplayManager (let's call it MyApplicationManager), it is important to add a call to the initialize() method in its constructor. This call assures that this manager is properly set up by the time it is instantiated.
We add components to our application by overriding the initComponents() method. Before dealing with the components, let's define the data we want to reuse among them. In this case, we are specifying the border color and the selection color (i.e., the color to be used when a component is selected) in shades of blue and orange, respectively. The beginning of our method looks like this:
{
float borderColor[4] = { 0.3, 0.5, 1.0, 1.0 };
float selectedColor[4] = { 0.8, 0.6, 0.1, 1.0 };
The components and containers are arranged in a tree structure in the framework. Thus, the first component we will be setting is the root component. In a tabletop application, the root can be thought as the table surface over which the other objects are placed. We can create it and set its properties as follows:
rootComponent->setPosition(400, 300);
rootComponent->setWidth(800);
rootComponent->setHeight(600);
The rootComponent object is defined in the LargeDisplayManager class and is a pointer to a VisComponent object that is the root of the components composite tree. In this case, we are using an object of the VisComponentGL class, which is a subclass of VisComponent provided in the toolkit package. We set the x- and y-coordinates of the position of the component and its width and height. These values can be anything at this point, since they will be overwritten with the actual values of the screen center and dimensions by the DefaultManager (the superclass of MyApplicationManager) as soon as the application window is created. We consider the origin of our coordinate system to be in the lower left corner of the screen.
We want the root component to have a gradient border and to be a friction surface (for tossing components). This is achieved by adding objects of the GradientBorderStrategy and FrictionSurfaceStrategy classes to the root component's sequence of strategies.
This is how we set the border of the root component:
rootBorder->setBorderWidth(-10.0);
rootBorder->setColor(borderColor);
rootComponent->pushStrategy(rootBorder);
We create an instance of the GradientBorderStrategy and set some of its properties. In this case, we define the border to have a width of 10 pixels. The negative value means that, instead of having the border in the outside of the perimeter of the component (what would be outside of the visible bounds), we want it to be in the inside of the component's perimeter. The border color is set as the bluish shade we defined earlier on. After this setup, this strategy is pushed into the sequence of strategies of the root component (which, until now, was empty).
Add the appropriate include file:
The FrictionSurfaceStrategy is set as follows:
friction->setBorderWidth(50);
friction->setBorderHeight(50);
rootComponent->pushStrategy(friction);
Here, we create an object of the FrictionSurfaceStrategy class and set its borders width and height to 50 pixels. What is called "border" of a friction surface is the region in the boundaries of the surface where we have a maximum friction coefficient (i.e., 1.0). In other words, this specifies that, when a tossed component enters this region, it should stop moving. This prevents tossed components from going beyond the surface boundaries. It should be observed that the size of this region should take into consideration the dimensions of the surface and the expected speed of the tossed components (the faster the tossing, the larger the region should be). This strategy object is added to the sequence of strategies in the root component, including this behavior on top of the other strategies (in this case, only the GradientBorderStrategy).
After we have added all the strategies we want the root component to have, we must force the initialization of its buffers. This is necessary only for the root and is done with:
Now, let's add an interface current belt container to our application. We start by creating the component and setting its properties, much like we did for the root component:
beltComponent->setPosition(450, 350);
beltComponent->setWidth(800);
beltComponent->setHeight(600);
The definition of the component as an interface current belt container is done by adding to it a CurrentBeltContainerStrategy. We do it like this:
currentBelt->setNumControlPoints(8);
currentBelt->setSplineLevels(4);
beltComponent->pushStrategy(currentBelt);
currentBelt->initialize(false);
As shown above, we first create an object of the CurrentBeltContainerStrategy class. The parameter in the constructor specifies how wide the belt should be (in pixels). Then, we set the number of control points in each boundary (inner and outer) of the belt and the number of subdivisions applied to the boundary spline curves.
Notice that we first add this strategy to the component and then we initialize it. This is necessary because this particular strategy needs to be initialized after binding the associated component. This initialization takes care of defining the initial shape of the component and its parameter indicates whether or not this container should have a round shape.
Additionally, we want to be able to move (translate) this container. Therefore, we should add a TranslationStrategy. This is accomplished by:
beltComponent->pushStrategy(currentBeltTranslation);
We simply create a TranslationStrategy object and push it into the component's sequence of strategies.
Finally, we add this container to our manager:
Let's complete the set of components that we are adding to our application with a number of image components. These components are images that we want to be able to move/toss around the surface and add to the container we just created. The images should be loaded as OpenGL textures and applied to a quadrilateral shape.
The LDF Toolkit offers a class that can help us loading the textures and provides the corresponding OpenGL texture names. Supposing that you have 10 PNG images in the 'images' directory inside your output directory and that they are sequentially named "0001.png" to "0010.png", this can be done as follows:
for (int i = 1; i <= 10; i++) {
std::string textureFile = "images/00";
if (i < 10) textureFile += "0";
textureFile += toString(i);
textureFile += ".png";
textureFiles.push_back(textureFile.c_str());
}
TextureManager texManager = TextureManager();
texManager.loadTextures(textureFiles);
This loads the images in the file paths given in the textureFiles vector as textures in the texManager object. The toString() method is a utility template method that converts a basic type into a std::string (see source code for more details).
Now, we can use these images as textures for the components we want to create.
Let's create 50 image components. For each of them, we create a component object and define pseudo-random values for its position, dimensions, and rotation angle, using an auxiliary function (obtainRandomFloat()) implemented in the DefaultManager class that returns a pseudo-random float number between the given maximum and minimum values.
VisComponentGL* c = new VisComponentGL();
c->setPosition(Point3f(obtainRandomFloat(800, 50), obtainRandomFloat(600, 50), 0));
float dimension = obtainRandomFloat(150, 50);
c->setWidth(dimension);
c->setHeight(dimension);
c->setRotationAngle(obtainRandomFloat(90) * TO_RADIANS_FACTOR);
Then, we create an ImageStrategy object that has as parameter the OpenGL texture name associated with an image. A pseudo-random valid texture name is provided by the texManager object. This strategy is added to the component.
c->pushStrategy(imageStrategy);
Now, we add a resizing handler. This is a small handler in the right lower corner of the component that, when pressed, allows the component to be resized. We create an instance of the ResizerHandleStrategy class, set the regular handle color and the color of the handle when the component is selected, and add this strategy into the component.
resizerHandle->setColor(borderColor);
resizerHandle->setSelectedColor(selectedColor);
c->pushStrategy(resizerHandle);
We also add a border to the component. We use a BorderStrategy object and set the same colors as we did for the handler.
border->setColor(borderColor);
border->setSelectedColor(selectedColor);
c->pushStrategy(border);
In order to have, at the same time, tossing and RNT (Rotation 'N Translation) enabled for our image components, we create an object of the TossableRNTStrategy class. We set the color of the RNT circle and the dynamic and static friction coefficients, before adding the strategy to the current component.
rnt->setColor(selectedColor);
rnt->setFrictionCoefficient(1.0);
rnt->setStaticFrictionCoefficient(10.0);
c->pushStrategy(rnt);
As a last feature, we want our image component to be responsive to the interface current belt container. For that, we have to add a strategy that will make the component aware of the current. This is the CurrentObserverStrategy class. We simply create an instance of this class and add it to the component.
c->pushStrategy(currentObserver);
Then, we set the component to be a leaf so that no component can be added to it. And, finally, we can add the current component to our manager.
addComponent(c);
}
}
Connecting Events
Let's go to our widget class (or the equivalent one, if you are not using Qt). Assuming that OpenGL and SBSDK are properly set up, we are now going to connect this class with the framework. For that, we add a reference to an instance of the Manager class we created (i.e., MyApplicationManager) as a private class member. Let's name it 'manager'.
The actual instantiation of this object has to be done inside the OpenGL initialization (i.e., inside the initializeGL() method, if using Qt). This is because some of the procedures triggered by the creation of a Manager object rely on having an OpenGL context available (for example, the creation of display lists).
In the resizeGL() method, after the usual projection setup, we should forward the resize event to the framework manager. This is done by adding the following line:
The width and height values are the same as the parameters of the resizeGL() method.
Then, in the paintGL() method, all we have to do is to clear the color buffer and notify the manager to render all its components:
manager->renderAll();
Let's now move to the SBSDK event handling methods (it is similar for the case of mouse event handlers). All we have to do here is to forward these events to the framework or to a component so that they can reach a strategy that knows how to deal with them.
In the case of the OnXYDown() method, we can have:
{
unsigned int userID = translateSmartIPointerId(iPointerID);
We start by using a function to convert the pointer identifier we got from SBSDK into a counting sequence starting from 0 (i.e., 0, 1, 2, ...). We use it as our user identifier.
Then, we obtain the component at the position of the event and check if one is found (if not, we do nothing and return):
if (component == NULL) return;
If we found a component, we want to draw it on top of others before handling the event. This means that we have to rearrange the tree of components so that the branch where this component is in is rendered after (on top of) the other branches. This is done by:
The next line creates a framework event object and sets its type, coordinates, and the identifier of the user who produced the event:
ConstantProvider::getInstance()->getEventTypeIdentifier("PRESS"),
userID, x, height - y - 1);
We use the ConstantProvider singleton class in the toolkit to dynamically obtain the type identifier of the event. It is mapped by the string "PRESS", which works as a case-sensitive key to the identifier value. This same string is used to identify the event when it is handled by a strategy.
Now, we can forward this event to the selected component through the manager. Remember to free the memory used to create the event object, as in:
delete evt;
}
The OnXYMove() and the OnXYUp() methods are similar. Besides the difference in the type identifier of the events (given by the keys "DRAG" and "RELEASE", respectively), there are some minor differences. The OnXYMove() method doesn't query for the component under the event position and simply passes the event to the framework, which forwards it to the currently selected component for this user. Also, there is no need to move the component to the front (it should already be there). In the OnXYUp() method, before creating the event object and passing it to the framework, the identifier of the component at the event position is added to the framework's update list. This means that, the position of this component will be used to check if the component should be moved inside the composite tree (i.e., if it should change parents). The code for both methods is given below:
{
unsigned int userID = translateSmartIPointerId(iPointerID);
LargeDisplayEvent* evt = new LargeDisplayEvent(
ConstantProvider::getInstance()->getEventTypeIdentifier("DRAG"),
userID, x, height - y - 1);
manager->processEvent(evt);
delete evt;
}
void MyProject::OnXYUp(int x, int y, int z, int iPointerID)
{
VisComponent* component = manager->getComponentAt(x, height - y - 1);
if (component == NULL) return;
manager->addToUpdateList(component->getId());
LargeDisplayEvent* evt = new LargeDisplayEvent(
ConstantProvider::getInstance()->getEventTypeIdentifier("RELEASE"),
userID, x, height - y - 1);
manager->processEvent(evt);
delete evt;
}
Conclusion of Part I
This finishes the first part of this tutorial. We covered the basics of how to create a simple large display application making use of the strategies provided in the LDF Toolkit.
In the next part, we will see how to create our own strategy classes, instead of using the ones provided by the toolkit.